
How to Paint a Room for the First Time
Never painted a room before? Here is everything you actually need to know — from choosing the right finish to cutting in without tape — from a mom who learned completely from scratch and has now painted almost every room in her house.
HOME DIY & DECOR
5/25/20269 min read
Painting a Room for the First Time: The Color
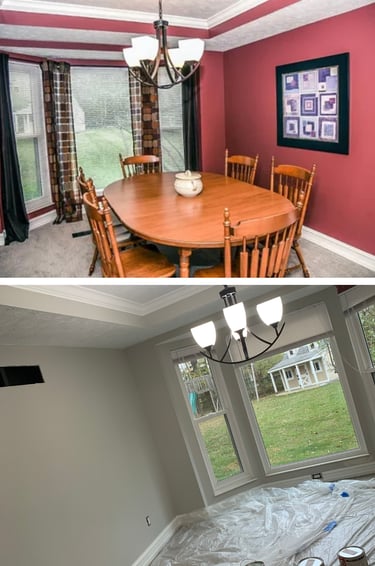
When we bought our house we inherited someone else's very bold vision. Bright yellow entryway. Red dining room. Warm light bulbs in every single fixture that made the whole place glow like a permanent sunset — and not in a good way.
Before we even moved in we repainted everything to a soft light gray. The whole house opened up immediately. It felt bigger, cleaner, calmer, and most importantly — like ours. We did not hire anyone. We had never painted a full house before. We just started and figured it out as we went.
If you have never painted a room before and the idea feels intimidating, I am going to walk you through every single step the way I wish someone had walked me through it the first time. No experience required. Just patience, the right supplies, and a willingness to learn as you go.
Before You Buy Paint — Read This.
My honest recommendation for almost every room: eggshell. Especially if you have kids. Eggshell has just enough sheen to wipe clean — crayon marks, handprints, mystery smudges of unknown origin — without looking shiny or plastic the way satin can in bright light. It is the sweet spot between durability and a soft natural finish.
The one exception: trim, doors, and baseboards get semi-gloss. The contrast between an eggshell wall and a semi-gloss trim is what gives a room that clean finished intentional look. Eggshell walls, semi-gloss trim. You will not regret it.
The Supply List — What You Actually Need
Here is my supply list after painting almost every room in my house. Not the list of everything that exists — the list of what actually gets used:
Heads up that some links in this post are affiliate links, meaning I earn a small commission at no extra cost to you.
The Four Things You Actually Need:
Angled paintbrush — 2.5 inch — your single most important tool. A good angled brush gives you clean edges, clean corners, and clean trim lines. Do not buy the cheapest one on the shelf — this is the one place to spend a few extra dollars and you will feel the difference immediately
Roller frame and cover — ⅜ inch nap for smooth walls, ½ inch for textured surfaces
Paint tray and liners — the liners make cleanup infinitely easier and cost almost nothing
Drop cloth — canvas over plastic every single time. Plastic slides, bunches, and is genuinely hazardous underfoot. Canvas stays put and lasts forever
That is genuinely it and it's the same stuff I reach for on my other home projects. Now let me tell you about two things that are on almost every painting supply list that I do not use — and why.
The Painter's Tape Conversation — My Honest Take
I do not use painter's tape.
I know. Every tutorial tells you to tape everything. Here is my honest experience: tape creates more problems than it solves. It bleeds if you do not press every single inch down perfectly. It peels paint if you leave it on too long. It takes longer to apply and remove than the time it actually saves. And it gives you a false sense of security that leads to less careful brush work.
What I use instead is my angled brush and a steady hand.
Load your brush with just enough to cover a square foot or two (it’s important not to put too much on your brush), get close to your trim line, and work slowly and deliberatel. Start slightly away from the edge and work toward it in smooth consistent strokes. The angled brush gives you control and a clean line with less work and less mess than tape.
That said — if you are painting your very first room and the idea of freehand cutting in makes you anxious, use tape while you are learning. There is absolutely no shame in it. Just press it down firmly with your fingernail along every single inch of the edge, paint carefully over it, and remove it while the paint is still slightly wet — not after it is fully dry. Tape removed from dry paint pulls the paint right off with it.
My honest recommendation: try the freehand cut-in from the start. You will get comfortable faster than you expect and you will never go back.
Primer — You Do Not Need It
Here is the second thing most tutorials insist on that I am going to push back on: primer.
I painted over a deep red dining room wall with a light gray and did not use primer. Two coats of good quality paint covered it completely. I have painted over multiple colors across multiple rooms in my house without a single separate primer coat and have never had a coverage or adhesion problem.
My opinion is that primer is often an unnecessary expense and an extra step that most beginner painting projects do not actually require. As long as your walls are clean, your repairs are dry and sanded, and you commit to two full coats of paint, you will almost certainly be fine.
Prep Work — The Step That Determines Your Result
A beautifully applied coat of paint over dirty unprepped walls looks worse than a mediocre paint job over properly prepped walls.
Clean your walls. Especially in kitchens and bathrooms where grease and grime build up over time. A quick wipe down with a damp cloth and a little dish soap handles most rooms. Let it dry completely before you paint.
Fill your holes. Every nail hole, every small ding, every crack — fill with spackling compound, let it dry, sand smooth, wipe away dust. This takes about fifteen minutes and makes an enormous visible difference in your finished walls.
Sand rough patches. If you have areas where old paint is peeling or surfaces are rough, a light pass with 120-grit sandpaper smooths them out. Wipe away all dust before painting.
Move and cover everything. Furniture out of the room or pushed to the center and covered. Drop cloth down on the floor. Outlet covers and switch plates removed — this takes thirty seconds per plate and makes a noticeably cleaner finished result around your electrical.
The Actual Painting — Step by Step
You have prepped your walls. Your supplies are ready. Your drop cloth is down. Here is the exact order of operations:
Step 1 — Cut In First. Always.
Cutting means painting the edges — along the ceiling line, along the trim, and in every corner — with your angled brush before you touch the roller. You always cut in first so your roller can blend into wet brush strokes for a seamless finish. Never roll first and try to brush the edges after.
Load your brush by dipping about an inch into the paint and tapping. Start slightly away from your edge and move toward it with smooth deliberate strokes.
Take your time here. This is the step that determines how finished your room looks. Rushing your cut-in shows in the final result every single time.
Step 2 — Roll in Sections
Work in roughly three-foot-wide sections from ceiling to floor. Load your roller fully — it should be well saturated but not dripping — and apply paint in a large W or M shape on the wall first to distribute the paint evenly, then fill in the gaps with smooth vertical strokes. The W or M first prevents the heavy uneven lines that come from rolling in one direction only.
Overlap each section slightly while the paint is still wet. Working into wet paint prevents the visible seam lines between sections that are the hallmark of a rushed paint job.
Step 3 — Watch For Drips
After every few sections step back and run your eye along the wall from a low angle. Drips and uneven areas catch the light and are completely easy to spot and fix while the paint is wet. Once paint dries — drips become permanent texture. I have drips on walls in my house right now that I still notice and still think about. They happened because I was moving too fast and missed them in the moment.
Step 4 — Two Coats. No Exceptions.
The first coat will look patchy and uneven. This is completely normal and does not mean anything is wrong. Every first coat looks like this. Let it dry fully — two to four hours depending on your paint and the humidity in your space — and then apply your second coat.
The Corner Situation — Why Room Size Actually Matters
Here is something I genuinely wish someone had told me before I started: the more corners a room has, the harder it is to paint.
A bedroom with four long flat walls is the most beginner-friendly room in your house. A bathroom, a laundry room, or a space with built-ins, nooks, and tight angles is a much more technical job. More corners means more cutting in, more precise brush work, and more opportunities for visible mistakes.
If you have never painted before — start with a bedroom. Build your confidence on the long open walls. Get comfortable with your roller. Develop your freehand cut-in technique where there is room to breathe. Then take on the trickier spaces once you have a few rooms under your belt.
The Accent Wall — Your Next Move
Once you have painted a full room and realized it was not as terrifying as you expected, the accent wall is your next move and it is one of the most rewarding things you can do for a space with almost no effort.
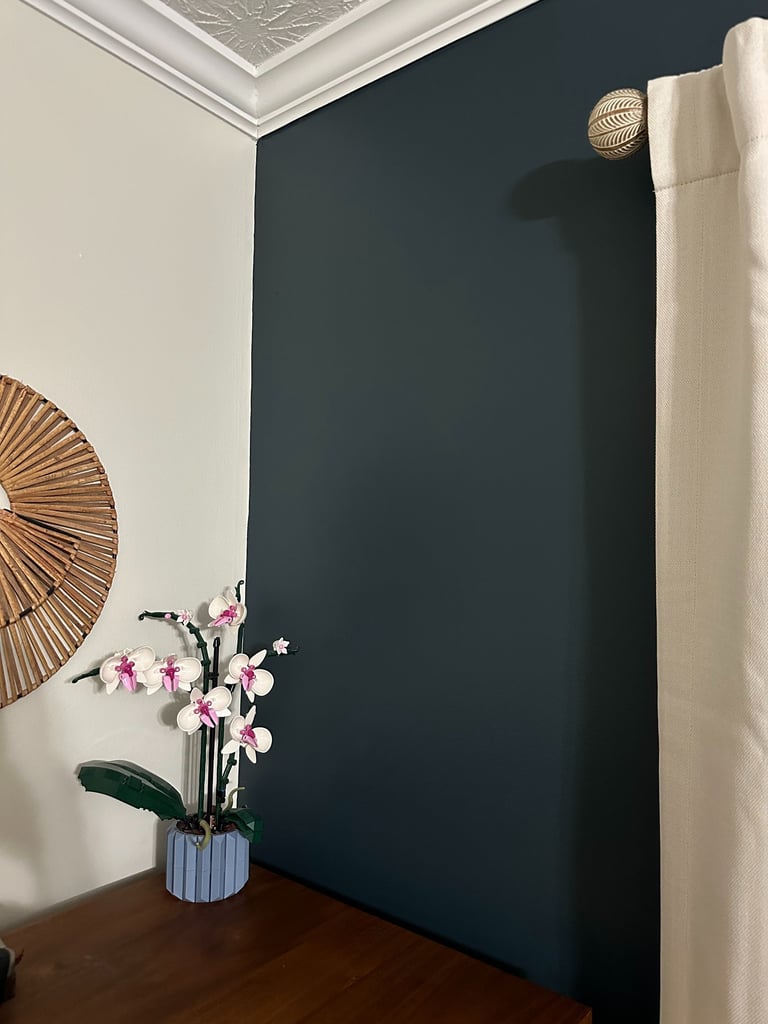
Pick one wall. Paint it a dramatically different color from the rest of the room. High contrast works best — deep navy next to soft cream, forest green next to warm white, rich charcoal next to light gray.
Paint your lighter color first:
When you paint the lighter surrounding walls first and let them dry, your darker accent wall color goes right over that corner edge and creates a naturally crisp clean line. The darker paint covering the edge of the lighter paint reads as sharp and intentional. If you do it the other way — dark first — you end up trying to cut your lighter color right up to a dark edge which is significantly harder to make look clean.
Touch Ups and Trim — The Details That Finish a Room
Fresh wall paint has a way of making everything around it look older and more tired than it did before. This is not your imagination — it is contrast. Once your walls look clean and new you start noticing the scuffed trim, the dinged door frames, and the yellowed baseboards in a way you never noticed before.
Fill nicks with wood putty, let it dry, sand smooth, and paint. You do not have to repaint every inch of trim every time you paint a room — just touch up the areas that now stand out against your fresh walls. Small details make a significant difference in how finished and intentional a room feels.
The Mistakes I Made So You Don't Have To
The single biggest mistake I have made — and still have to remind myself not to make — is rushing.
Painting is a project where the urgency you feel to just get it done works directly against your result. When you rush you skip prep steps. You load your roller unevenly. You stop mid-wall to answer a question or check on a kid and come back to a visible lap mark. You miss drips that you do not notice until the paint is dry and now they are permanently part of your wall.
Slow down. Check your work as you go. The extra twenty minutes of patience is worth more than anything else on this list.
Other mistakes worth learning from:
Using flat paint in a high-traffic area. Beautiful finish. Impossible to clean. I said eggshell everywhere a child exists and I meant it.
Not cleaning walls before painting. Paint over grease or dust and it will not adhere evenly. The fifteen-minute wipe-down feels like an unnecessary step until you skip it and see the result.
Stopping mid-wall. Always finish the section you are rolling before you stop for anything.
Second-guessing your color after the first coat. The first coat always looks wrong. It looks patchy, streaky, and nothing like what you imagined. This is normal. Do not panic. Do not repaint. Do the second coat and then decide.
What Fresh Paint Actually Does
We walked into a house with a yellow entryway and a red dining room and we painted it all to a soft light gray before we even moved our furniture in. And it looked like a completely different house. Not renovated. Not remodeled. Just painted.
That is how much power a color change has.
I am currently eyeing a shade of green for my kitchen — because once you start painting you genuinely cannot stop seeing the potential everywhere you look. That one is a project for another day and another post. Stay tuned.
But if you are standing in a room right now that does not feel like yours — that still has someone else's choices and someone else's energy in it — paint it. This weekend. It costs less than a dinner out, requires zero prior experience, and will make you feel like you completely transformed your home.
Start with a bedroom. Get your samples on the wall first. Skip the tape if you are feeling brave. Do two coats no matter what. Go slow.
And don't forget to grab our free Room Painting Checklist and follow along step by step. It'll save you time, mistakes, and headaches.

STAY CONNECTED
GET IN TOUCH
Questions or ideas?
AngelaMarie@mommakeshome.com
© 2026. All rights reserved