The Tools Every Beginner DIYer Actually Needs (And the Ones You Can Skip)
A complete beginner's guide to the home improvement tools that actually matter — covering painting supplies, drywall patching tools, and wallpaper essentials. Includes what's genuinely worth buying, what to skip, and a realistic starter budget for anyone just getting into DIY.
HOME DIY & DECOR
6/27/20264 min read
The No-Fluff Guide to Beginner DIY Tools
If you've just dabbled into the world of DIY home improvement, I can honestly tell you — you do not need fifty tools and a wall-mounted pegboard to get started. Those things can and will come with time. The most important part, in my opinion, is just getting your feet wet and getting comfortable. Once you do, you'll likely become addicted to the before and after and the satisfaction it brings, and you'll naturally start acquiring more tools along the way.
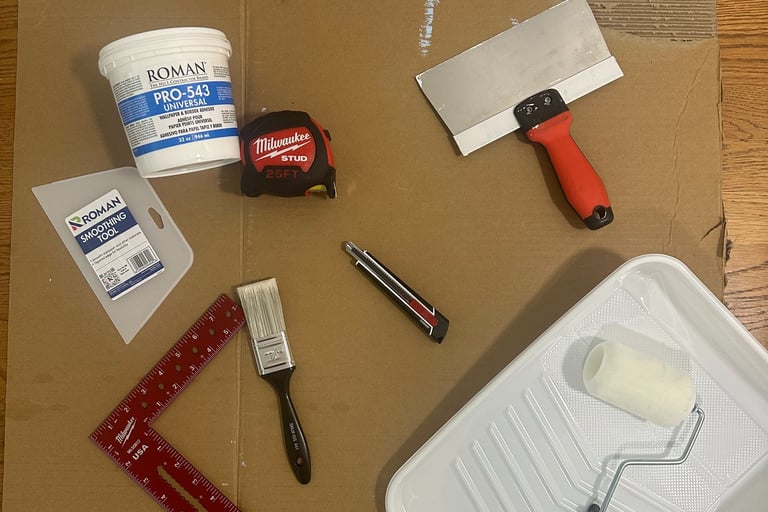
I've painted nearly every room in my house, patched drywall more times than I can count, and hung my first wallpaper this year. Here is the honest list of what actually got used — broken down by project type — and what's worth skipping.
Heads up — this post contains affiliate links. As an Amazon Associate, I earn from qualifying purchases at no additional cost to you. Thank you for the support!
General Tools — Buy These First, No Matter What You're Tackling
These are the tools that show up in almost every project, regardless of what you're working on.
Tape measure — Non-negotiable. You will use this constantly, for everything, forever.
Level — A basic torpedo level is enough. You don't need anything fancy. However, I do have my eye on a laser level which looks amazing.
Utility knife with extra blades — A sharp blade matters more than people realize, especially for things like wallpaper or trim work. Dull blades make every cut worse.
Putty knife (a couple sizes) — Used for spackle, drywall, even helping guide a clean blade cut. More versatile than it looks.
Painter's tape — Even if you don't use it for every project, keep a roll on hand.
Cordless drill — This is the one "real tool" worth investing in early. A drill handles 90% of beginner projects — hanging shelves, curtain rods, anything that needs a screw.
Painting Tools — What I Actually Use Every Time
Angled brush (2-3 inch) — For cutting in around trim and corners. A good angled brush makes a bigger difference than people expect.
Roller and roller covers — A 9-inch roller for most walls. Keep a few extra covers on hand since they wear out faster than you'd think.
Paint tray with liners — The liners are a small thing that makes cleanup so much easier. Worth the extra few dollars.
Stir sticks — Obvious, but easy to forget, and paint separates more than people expect. Any hardware store gives them to you for free with a paint purchase, my advise is to grab a handful each time you buy to create a stock pile.
Skip These for Painting
Paint edgers (the little plastic guide tools) — These get recommended a lot, but from what I've seen and heard from other DIYers, a steady hand with a good angled brush works better every time. I never felt the need to buy one.
Expensive specialty rollers — A basic quality roller cover does the job. No reason to spend extra on a "professional" version for a bedroom wall.
Drywall and Patching Tools — The Short List
Drywall putty knife — Different from a regular putty knife — wider and more flexible for smoothing.
Sanding sponge or fine-grit sandpaper — For smoothing patches before painting over them.
Pre-mixed spackle or joint compound — For small holes, pre-mixed is genuinely all you need. No reason to mix your own for small patch jobs.
A scrap piece of cardboard or an old container lid — Sounds silly, but having something to hold a small amount of compound while you work makes the whole process smoother.
Skip These for Drywall
A full drywall repair kit with mesh patches — Great for big holes, but overkill for the small nail holes and dings most beginners are dealing with. I've never needed one for the patch jobs I do.
A drywall saw — Unless you're cutting full sheets, you won't need this for basic patch work. Not something that's ever made it into my toolkit.
Wallpaper Tools — What I Learned After My First Project
Smoothing tool — For pushing out air bubbles as you go. Makes a real difference in how clean the final result looks.
A sharp utility knife — Trimming wallpaper edges cleanly depends entirely on blade sharpness, I personally prefer the snap off blades for wallpaper to make sure it is sharp enough.
A straight edge or large ruler — Helps guide clean, straight trim cuts along edges and corners.
A bucket and sponge — For wiping excess paste as you go, especially with pre-pasted wallpaper.
Skip These for Wallpaper
A wallpaper steamer — Only necessary if you're removing old wallpaper, not applying new. Skip it unless you actually need to strip walls first.
Specialty wallpaper scissors — A regular sharp utility knife does the job better for trimming anyway — no need for a single-use tool.
The One Tool Worth Spending a Little More On
If there's one place I'd tell a beginner to actually spend a bit more money, it's the drill. This is the one tool where quality genuinely changes your results and if you invest in a good one it should last you a very long time — everything else on this list, the budget version works just fine.
What This Actually Costs to Start
Here's the reassuring part: outside of the drill, almost everything on this list is inexpensive. You could realistically put together a solid beginner kit — covering painting, basic patching, and small wallpaper projects — for under $75 total, especially if you already have a few basics lying around the house.
You don't need to buy everything at once either. Buy what your current project needs, and your toolkit builds itself naturally over time. That's exactly how mine did.
STAY CONNECTED
GET IN TOUCH
Questions or ideas?
AngelaMarie@mommakeshome.com
© 2026. All rights reserved