We Fixed Our Rotted Shed for Under $400 — DIY Shed Repair Step-by-Step
We repaired our rotted shed for under $400 using simple tools, pressure-treated wood, and a step-by-step DIY approach anyone can follow. If your shed has soft, crumbling wood or visible rot, this guide walks you through exactly how to assess the damage, replace rotted panels, and rebuild it without
HOME DIY & DECOR
5/17/20268 min read
DIY Shed Repair: When the Shed Started Falling Apart (Literally)
Our shed had been visibly rotting since we moved in six years ago. Not catastrophically at first — just the kind of thing you notice, add to the mental list, and tell yourself it’s a problem for another day. Then – winter after winter, storm after storm, it stopped being a future problem and became a very present one. Boards that had been soft became boards that were literally falling apart.
And here is what I want you to know before anything else: I am not a professional, I am an intermediate DIYer, at best, who learned most of what I know from my dad — who, for this project, showed up and became my on-site teacher while my mom kept the kids occupied so we could actually get it done. Two weekends, a car jack, one wrong plywood purchase we had to exchange, and under $400 later — the shed is solid again.
This is the full story of how we got there.
Table of Contents
Step 1: Assess the Damage Before You Touch Anything
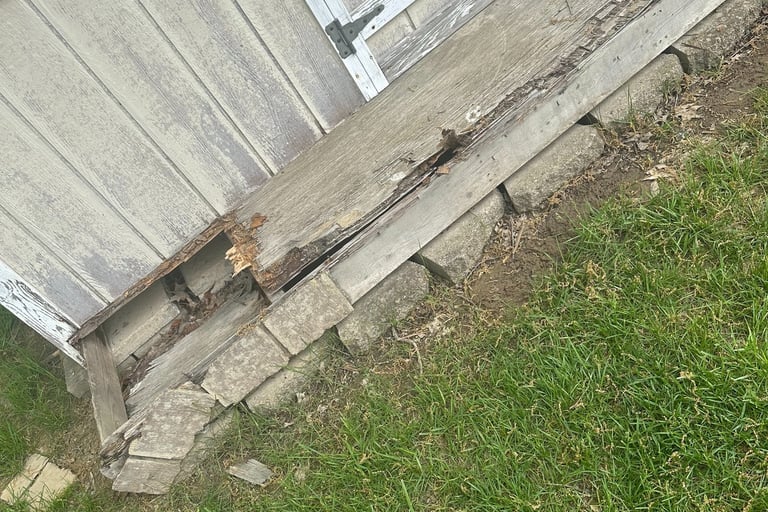
Before you touch a single tool, you need to know exactly what you are dealing with — and I want to be honest with you about something: the ease of this project depends almost entirely on your damage assessment.
Ours was damaged on the outside only. The interior framing and floor were structurally sound, which meant we could cut out and replace exterior panels without dealing with anything inside. That made our job significantly more manageable.
If your rot has worked its way inside — into the floor, the interior walls, or the structural framing — you are looking at a bigger job. Not an impossible one, but a bigger one that deserves its own honest assessment before you commit to a DIY approach.
Here is how to assess properly:
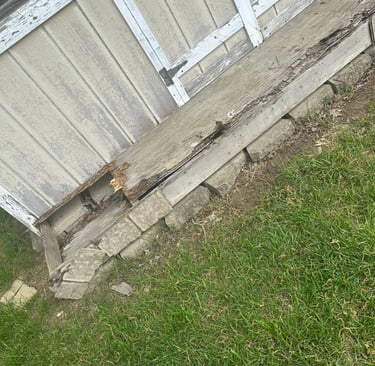
Walk the entire exterior and press gently on every surface — rotted wood will feel soft, spongy, or give under light pressure in a way that solid wood does not
Check along the bottom edges first — this is where rot almost always starts because it is where moisture collects
Check the corners, around any windows or doors, and anywhere you see discoloration or paint peeling in an unusual pattern
Then go inside and check the floor and interior walls — press on everything
Make a written list of every compromised area, even spots that feel borderline
For exterior-only damage like ours, this guide covers everything you need. For anything more extensive, take stock carefully and decide whether a professional consult makes sense before you start cutting.
Step 2: Measure Everything Before You Buy Anything (We Learned This the Hard Way)
Once you know what needs replacing, measure everything precisely before you buy a single board. And I mean everything — because here is something we learned the hard way so you do not have to: plywood comes in multiple thicknesses and they are not interchangeable.
Our shed was built with ¾ inch plywood. We also have a playhouse we are repairing — story for another time — and that one uses ½ inch. We did not know that when we bought materials. We purchased ½ inch thinking it would be the same as the playhouse, got it loaded in the truck, loaded out of the truck just to learn we had to load it back to return it. Thirty seconds with a tape measure at the cut edge of the existing panels would have saved us that entire trip.
The most common shed plywood thicknesses are:
⅜ inch — thinner panels, older or lighter duty sheds
½ inch — common in playhouses and lighter structures
⅝ inch — mid-range, good balance of weight and strength
¾ inch — heavier duty, what our shed used, common in older builds
Getting the wrong thickness means your replacement panel either sits proud of or sinks into the surrounding surface — both of which create gaps for moisture and look wrong. Measure the thickness at any cut edge or exposed corner, write it down, and buy exactly that.
Also measure the total square footage of everything you are replacing and add 10% for waste and any cutting errors. Then measure your post dimensions if those need replacing too.
Step 3: Pull Your Tool and Materials List Together
Replacing rotted wood projects either live or die by having the right tools and materials before you start. Here is the complete list of everything we used: Heads up that some links in this post are affiliate links, meaning I earn a small commission at no extra cost to you.
Tools
Oscillating multi-tool — your most important tool for this job. Makes precise cuts in tight spaces, lets you cut along edges without damaging surrounding material, and removes rotted sections cleanly. If you do not own one, buy one — you will use it on every project going forward
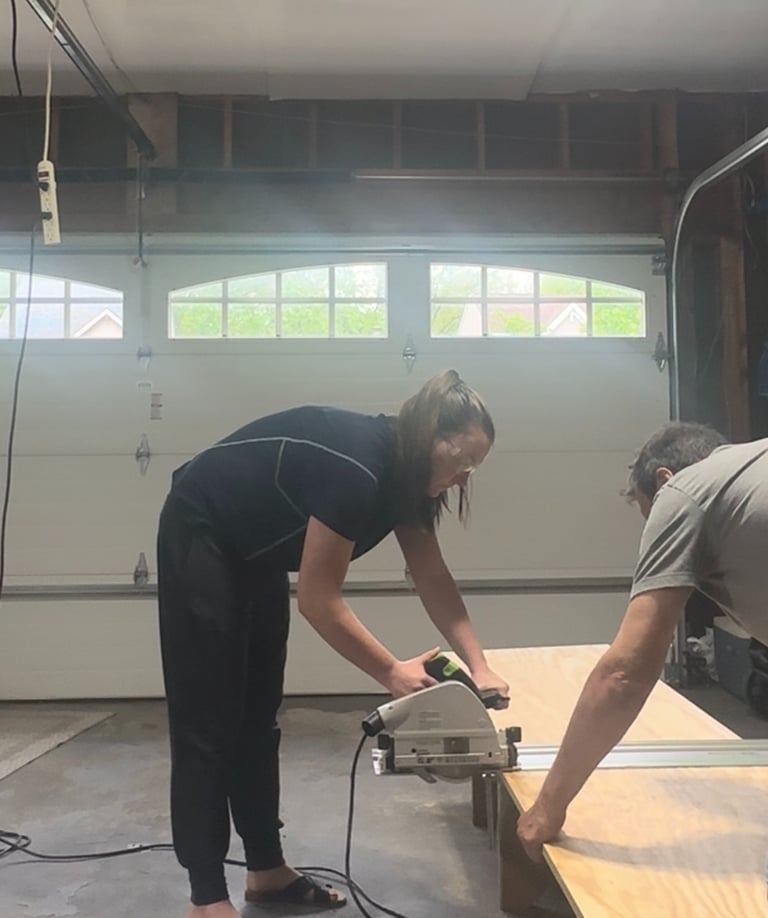
Track saw — gives you a perfectly straight, clean cut every single time. If you have access to one, use it. If not, a circular saw with a straightedge clamped as a guide will work — it just takes more patience
Drill — for driving screws when attaching replacement panels
Hammer — for nails and general persuasion when needed
Car jack — yes, a regular car jack. More on this in a moment
Safety glasses and full PPE — non-negotiable. Rotted wood and old shed material throws debris. Protect your eyes every single time
Materials
Pre-treated Plywood in the correct thickness — measure first, buy right
Pre-treated 4x4 or 6x6 posts — for any post replacements
Pre-treated 2x4 lumber — we needed this to sister a new piece under the damaged side and it was not on our original list. Depending on your damage, this may be needed
Box of common nails
Exterior wood screws
A Note on Tools and Cost
We were fortunate to already own most of our tools going into this project which kept our costs almost entirely in materials. If you do not have the tools yet — do not let that stop you or scare you off. Quality tools are an investment that pays for itself across every project you do. A good drill, a reliable saw, and an oscillating multi-tool will show up on your materials list again and again for years. Buy them once and use them on everything.
Step 4: Cut Out the Rotted Sections
Using your oscillating multi-tool, cut along the edges of each rotted section. Work slowly and deliberately — the oscillating tool gives you a lot of control and you want clean, straight lines that your replacement panel will sit flush against. Cut just inside any solid framing members so your new panel has something solid to attach to at every edge.
Remove the rotted pieces and set them aside. Before anything else happens — before any new wood goes near that opening — spray the exposed framing and all surrounding areas with your mold killing spray.
Rot almost always brings mold with it. If you seal new wood over untreated mold you are not fixing the problem — you are just trapping it inside your wall where it will quietly get worse again. Treat it, let it dry, then move on.
Step 5: Cut and Install the Replacement Panels
Before you cut your new plywood, measure the opening one more time. Yes, even though you already measured it. Openings are rarely perfectly square and a second measurement takes thirty seconds and saves a ruined panel.
Using your track saw — or your circular saw with a straightedge guide clamped in place — cut your replacement piece to size. A clean, straight cut means your new panel sits flush, looks intentional, and leaves no gaps for moisture to sneak back in. If your cut edges are slightly rough, run sandpaper along them before installing.
Test fit the piece before you attach it. Hold it in place, check all four edges, make sure everything sits flush. Adjust if needed. Then attach it — exterior screws along the framing members, nails where appropriate, working from the center outward to prevent any bowing.

Step 6: The Car Jack Moment
I want to give this its own section because it deserves a moment: we used a car jack to lift the shed just enough to place a new 2x4 under the floor of the shed.
A regular car jack from the truck of the car. Lifted the side of the shed just enough to work underneath, slid the new pre-treated 2x4 into place, secured it, and lowered it back down.
It was so satisfying.
Step 7: Replacing the Rotted Posts
The process for post replacement is straightforward: assess which posts are compromised, get pre-treated replacement lumber cut to length, remove the damaged post, treat the area for mold, and install the new one. New posts are inexpensive — the bigger investment is your time.
The one word I will repeat until you are tired of hearing it: pre-treated. Pressure-treated lumber has preservatives built in that resist moisture, rot, and insects. Standard lumber at ground contact will start this whole cycle over again within a few years. Spend the little extra. Get pre-treated every single time.
What We Spent and How Long It Took: DIY Shed Repair
The Budget
Since we already owned our tools, our costs were almost entirely materials — wood, hardware, mold spray, and fasteners. All in we came in under $400 for the full repair including new plywood panels, replacement posts, the 2x4 framing piece, and all hardware.
For context: shed repair labor alone typically runs $50-100 per hour with a contractor. A repair of this scope would have been quoted at several times what we spent in materials. The difference was our time and a willingness to figure it out.
The Timeline
This project took us roughly two weekends to complete — and I want to be honest about what that means with three kids under six. It means working in real windows of time, stopping when you need to stop, and accepting that some days you get two productive hours and some days you get forty-five minutes before someone needs something.
My mom came to help with the kids while my dad and I worked on the shed. He has been my DIY teacher for as long as I can remember and having him on site meant we moved faster and smarter than I would have managed alone. If you have someone in your life who knows their way around a saw — a parent, a neighbor, a friend — this is the project to call them for. The extra set of hands is helpful. The knowledge they bring is invaluable.
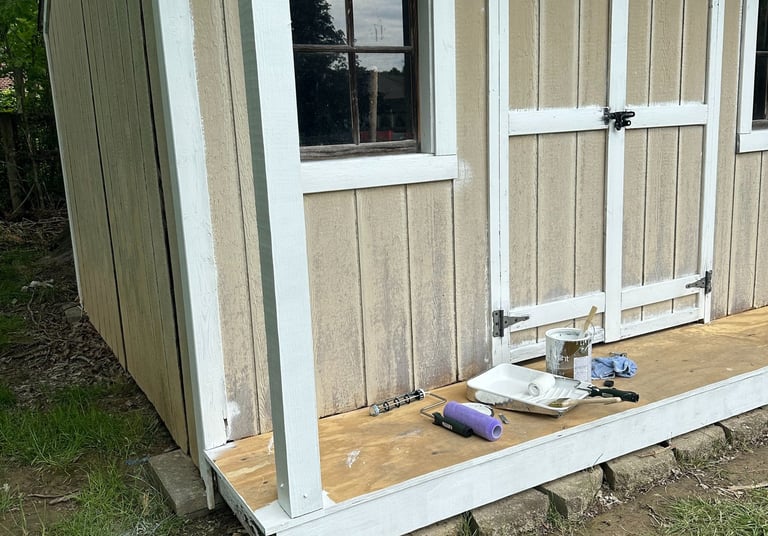
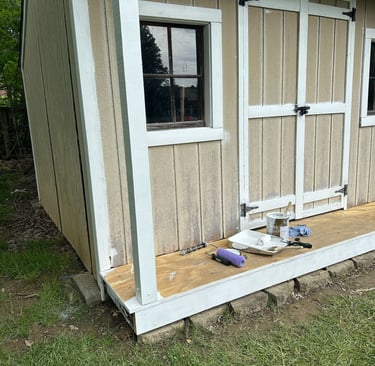
What's Next — The Paint Chapter
The shed is structurally solid and the next step is paint. I have already started with exterior latex paint I had on hand — because if there is one thing this blog stands for it is using what you already have before buying something new.
A full post on painting the shed exterior is coming — including what prep work actually matters, why exterior latex is the right call for shed surfaces, and how to get a finish that holds up through real Ohio weather. Stay tuned.
Before You Call a Contractor — Read This First
Six years. That is how long this project lived on the mental list before it became urgent enough to tackle. And now that it is done I genuinely wish we had done it sooner — not because it was easy, but because it was doable. More doable than six years of looking at it and feeling like it was too big ever let me believe.
A few things worth remembering as you look at your own project:
The ease depends on your damage. Exterior only, like ours, is very manageable. Interior damage or floor replacement is a bigger job — assess honestly and plan accordingly before you start cutting.
Measure your plywood thickness before you go to the store. Measure the cut edge. We learned this one at the hardware store return desk and you do not have to.
Use pre-treated lumber for anything touching the ground. Every time. No exceptions.
Do not let the tool list intimidate you. If you do not have them yet, the investment pays itself off across every project that follows this one.
Enlist your people. My mom kept three kids entertained for two weekends so my dad could teach me how to fix a shed.
Save this post for later – you’ll want it when your ‘someday project’ becomes a right-now one.
Related Posts
STAY CONNECTED
GET IN TOUCH
Questions or ideas?
AngelaMarie@mommakeshome.com
© 2026. All rights reserved